You have modified your UpSlide templates and themes and want to share them with your team. You may also have received a new customization from your UpSlide representative that you need to share. This article explains how to publish or install template modifications.
How it works
When you update and save your UpSlide templates, the modifications are applied only locally. As a result, only you, the administrator, can access them. To make your updated templates available to your team, publish them to your shared content location.
You can find your shared customization path in UpSlide Settings by selecting the Templates & Styles tab. By checking the Use team settings box, you ensure you have access to the shared path as configured for your account.
When you publish your modifications, UpSlide creates a .upslide file and saves it to the shared path. These files work like .zip files: they contain your PowerPoint, Word, and Excel templates at a specific point in time. All templates are included, even if the modification affects only one application.
If the shared path is a SharePoint path, publishing also adds information to an upslide column, such as the author’s name and publication date.
Publish and share template modifications
You have modified your templates and want to share them with your team. To do so:
- Save and close any UpSlide template that you have open. You cannot publish template modifications while template files are open.
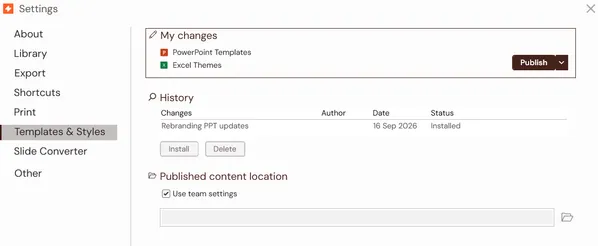
- Open Settings > Templates & Styles and verify that Use team settings is selected. This ensures that your content is published to the shared path configured for your account.
- Click Publish, name your changes, and click OK export them.
- After the templates are published, the change appears under History with the status Installed.
For the changes to be installed on your colleagues’ computers, they need to:
- Have access to the shared path.
- Restart their Office applications.
When UpSlide detects that new templates are available, it downloads the .upslide file. After the download is complete, users are prompted to restart their Office applications. Restarting PowerPoint, Excel, and Word at the same time ensures that all template modifications are installed and prevents one application from using an outdated template.
This troubleshooting article provides guidance if users encounter any issues installing new templates.
Install and share template modifications
You have received a .upslide file from your UpSlide representative and want to install the changes and share them with your team at the same time.
- Download the .upslide file.
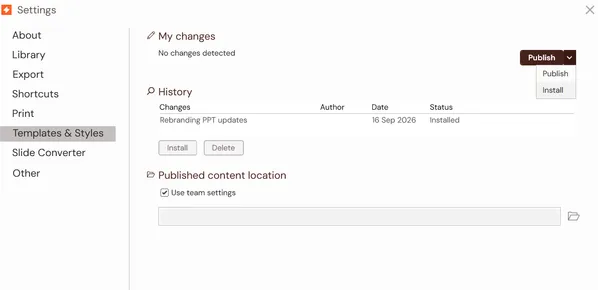
- In any Office application, open Settings > Templates & Styles and verify that Use team settings is selected. This ensures that your content is published to the shared path configured for your account.
- Click the dropdown menu next to Publish and select Install.
- Open the Downloads folder and select the .upslide file that you downloaded.
- Name the changes and click OK to export them.
- Close all Office applications so UpSlide can install the new templates on your computer.
Install template modifications locally
You have received a .upslide file from your UpSlide representative and want to test it before sharing it with your team. You can install the modifications locally without publishing them.
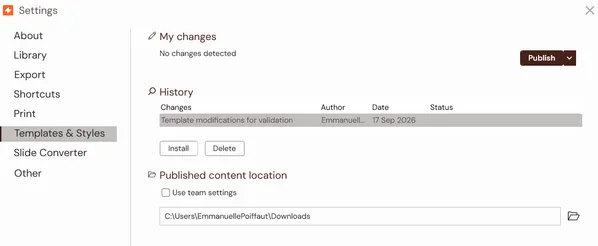
To do so, uncheck Use team settings and select the folder that contains the .upslide file. Then install the template modifications:
- Click the entry under History.
- Click Install and wait to be prompted to restart your Office applications.
- Close all Office applications for the modifications to install.
Once you restart your Office applications, the modifications will be installed. You can go back to your earlier templates by checking Use team settings and following the same steps.