
The UpSlide shared library gives you access to your branded, up-to-date slides, logos, resumes, tables, and graphs directly from PowerPoint, Excel, or Word. This article is aimed at Administrator users looking to add, edit, or remove that content. If you want a technical understanding of how it works, see this article.
As an administrator, when you right-click the Library, you get access to a set of additional buttons designed to:
- Add, rename or delete items.
- Replace existing items (for Slide Check to notify users).
- Create and rename folders (or subfolders at any level).
Create, rename or delete existing items
If you’ve never used the Library before, click here to read about the main tips for navigating and searching in the library.
Folders
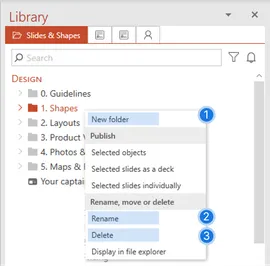
Right-click on a folder and:
- Creating a subfolder: click New folder (1)
- Renaming a folder: click Rename (2)
- Deleting a folder: click Delete (3)
N.B. This action cannot be undone, and all folder content will be deleted as well.
Note that the folders and items in a folder are stored alphabetically. Therefore the only way to modify the position of the contents is by renaming the items.
Want a different order? Add numbers or letters to the beginning of the names of folders or items.
Content
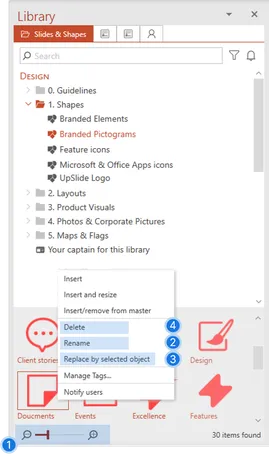
- Viewing: Use the zoom level (1) to display/hide names and sizes of previews similar to native Windows
- Renaming: Right-click within the library pane and item and choose Rename (2)
- Updating content with new versions: with your updated content selected in the application right click and choose Replace by selected shapes (3)
- Deleting: choose Replace by selected shapes (3)
N.B. you cannot undo this action.
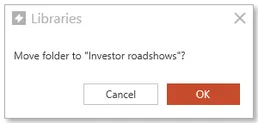
You can drag and drop folders or items around your Library to easily restructure it just like using Windows File Explorer. You’ll get a confirmation message to help avoid moving items while browsing the library.
Adding content to the libraries
The UpSlide libraries can contain slides, decks of slides, worksheets, workbooks, documents, text paragraphs, shapes, images, tables, charts, textboxes etc.
Each file you add to the library can contain multiple elements; but all elements must be of the same type. E.g. One file can contain multiple slides, but that file cannot also contain charts. Instead you have two files with the two content types.
Slides and whole decks

- Open your presentation containing the slides (nb: for consistency, all slides added to the Library must have been created using an UpSlide template. If you receive a popup warning, please follow this procedure.)
- In the PowerPoint navigation pane on the left, select the slides you wish to publish in the Library.
- Right-click in the Library where you want the content to be published and choose Advanced Publish…
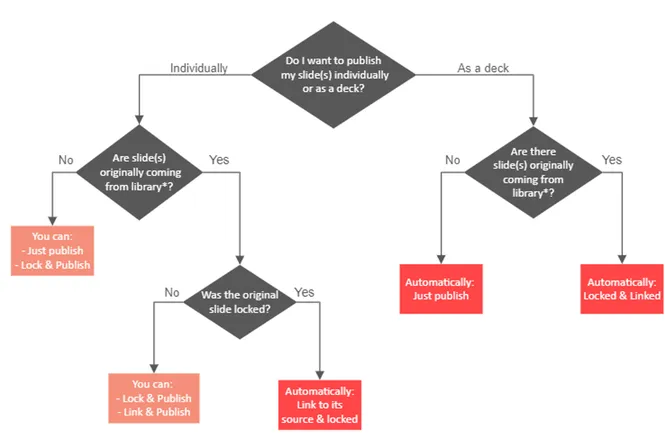
- A window allows you to publish slides as a deck (several slides as one single item) or individually (all slides as separate items).
- After selecting the corresponding publishing mode, choose any option you wish to apply.
- Click on Publish.
If you have any doubts about the options you should apply, you can have a look at our articles on linked slides, or locked slides or have a look at the diagram below.
Objects (shapes, images, tables, charts, textboxes etc)

Although visible in all three applications, you must insert objects from PowerPoint.
- Open the objects within a presentation.
- Group the objects if you want them to be added as a single item. E.g. A headshot + textbox with CV info.
- Optional: Press Alt+F10 to open the Selection pane to name the object. You can rename the object afterwards within the library pane.
- Select the objects or the slides containing the objects. If you select multiple slides all their objects (except slide titles, footers and page numbers) will be added to the library.
- With your items selected now in the library pane, right-click where you want to add the object and in the Publish section choose Selected shapes. If you right-click on a folder a new file will be created, but if you right click an existing file the objects will be added to it.
The position from which you insert an object will be retained and used when the item is accessed. E.g. Add an image when it’s correctly positioned on a slide and it will be correctly positioned when users access it.
If colours of objects look different when inserted into different document, it is most likely linked to the color palette of the active file. Click here to read how to fix the color in place.
Sections of text and Word files

The Word library can contain shapes, paragraphs of text and whole pages. If you want more flexibility than the templates button offers, entire documents can be added.
- Open your Word document and select the paragraph to publish.
- In the library pane right-click where you want to add the item.
- In the Publish section choose Selected text or if you want the entire document choose Current document.
Excel workbooks
The Excel library can contain:
- Whole workbooks which open as a new file for a user
- Single sheets which add to the workbook a user has open
- Groups of sheets which add to the workbook a user has open
If a workbook contains macros they will be preserved in the library and usable when inserted. To add content to the Excel library:
- Open an Excel workbook.
- In the library pane right-click where you want to add the worksheet/book.
- In the Publish section choose Current workbook to insert the entire workbook OR Selected sheets to insert the currently selected sheets as a group.

To reduce the time it takes your users to insert always clean the workbook before inserting in the library.
Replacing slides
To update the content of your slides in your library, follow these steps:
- Insert the slide(s) you want to edit from the Library in your presentation and make your changes.
- In the Library, right-click on the slide(s) you wish to replace and select Replace with selected slides…
- Choose the options you wish to apply (locked slides, linked slides, etc.)
- You can use the Push outdated warning box to notify users that they have used an outdated slide in a previous presentation. The pop-up will appear when users reopen their presentation.
- If the slide is locked, the option is checked by default.
- If the slide isn’t locked, you can choose to check the outdated warning or not.
- You can’t lock whole decks.
- Click Replace.