Keep your PowerPoint and Word documents aligned with your Excel data by linking charts, tables, and figures. Export content from Excel, control how it fits in your document and refresh your links to keep your reports accurate.
Try the feature for yourself by following this guided tutorial.
Summary
Create links
Link tables and charts
- In PowerPoint, select the slide or page onto which you want to export your data
- Open your Excel workbook and select the table or chart you want to export
- Within Excel, go to the UpSlide toolbar PowerPoint button and select Export to PowerPoint from the drop-down.
- Once the link has been created, remember to save both the PowerPoint and Excel files to ensure the link remains intact.
Your items are linked across as dynamic images. This helps ensure that the file size remains light while preserving the quality of your source data. You can reposition the image into the correct location on your slide or page.
You can also create a table and chart link by copying it from Excel and pasting it in PowerPoint. You will see a prompt at the top right-hand side to use the UpSlide link, which will create the dynamic image.
Resize and Export tables and charts
When using the Link, you can also predetermine the position and dimensions of your export, allowing you to ensure that the linked image fits perfectly on the slide.
To use the resize and export feature:
- Select the text box or placeholder where you would like the data to go. The shape of the placeholder will determine the dimensions of the linked item.
- Press the spacebar to remove any unwanted text from the placeholder
- In Excel, select the table or chart that you would like to export
- Click the down arrow on the PowerPoint button in Excel and select Resize and Export from the drop-down
The table or chart will link directly to the PowerPoint placeholder. Remember to save both the PowerPoint and Excel files after linking.
When using this option, the table or chart will be adjusted in Excel to match the size of the newly linked object in PowerPoint.
Do you want to control the size adjustments rather than UpSlide doing it for you? Try our Sizing Guide instead.
Link text
If you would like to maintain consistency between the commentary written in PowerPoint and the figures shown in your tables/charts, you can link those figures into your text placeholders to keep them up to date.
- Within PowerPoint, select the text where you’d like to insert your link
- Select a single cell in Excel
- Select the Export option. A popup will ask you to choose between exporting its content as text or an image. Select text.
In the case of text, data is exported to the selected location as a hyperlink (similar to what is generally used for cross-references) linked to the source cell in Excel.
You may want to export a text link using an empty cell that you plan on filling later. In this case, UpSlide will display #Empty Source Cell# instead of a blank export. If you’d prefer not to display the error message, you can type =CHAR(10) in the cell. UpSlide will detect the formula and not show the error.
Hide Text Links
When data is linked as text using UpSlide, it is formatted as a hyperlink in PowerPoint. This is to quickly show you what text/figures linked to Excel are and what are not. However, these hyperlinks may need to be removed before presenting or printing the presentation.
To remove the hyperlink, click the Hide Text Links button within PowerPoint. If you need to edit the presentation further, click the Unhide Text Links button to restore the hyperlinks.
Text exports are automatically unhidden when creating a new text link or opening the Excel Link Manager pane.
Update linked items
How the update works
An update refreshes the items in your document with the latest data from their Excel source so you don’t need to delete and recreate them. Before you start, open the workbook that contains the data you want to use. This helps UpSlide find the correct source.
If you don’t know which workbook contains the source data, right-click a linked item in your document:
- Select Go to source to open the workbook used previously.
- Select Link Information to view the workbook’s name and location.
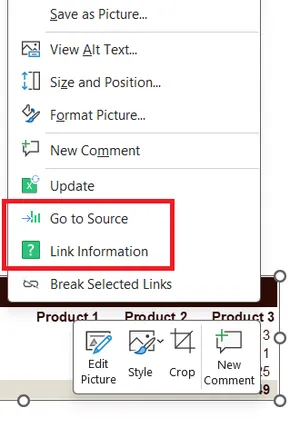
You can update one link at a time or refresh several links together. Choose the option that matches the changes you made in Excel.
- Update a single link when you know exactly which item changed. This option is useful when you only need to refresh one chart, table, or other linked item.
- Use the Excel Link Manager when you need to update several linked items, a selection, or an entire report.
If you have several workbooks open, UpSlide checks each one to find the source of your links. When several versions of the same workbook are open, UpSlide uses the most recently used version to update the link.
UpSlide checks all open workbooks, whether you update one link or several links at once, to find the latest source. This search usually takes most of the update time. To speed up the process, close any irrelevant workbooks before updating. Switching from a multiple-link update to a single-link update is generally less effective.
Update one item in your document
There are several ways to update a single item. You can choose the method that is most convenient for you.
From the item: Right-click the linked item and select Update.
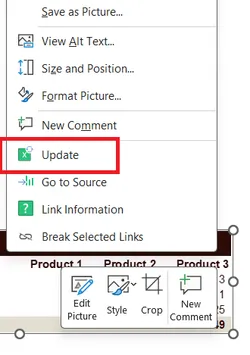
From the UpSlide ribbon: Select the item, then click Update.
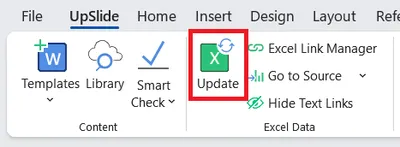
With a keyboard shortcut:
- Ctrl+Shift+E in PowerPoint.
- Ctrl+Shift+U in Word.
Update multiple or all items in your document
Use the Excel Link Manager (ELM) to update several Excel-linked items at once. The ELM displays your links in a single pane and lets you group them by slide, page, or Excel source.
To update multiple links at once:
- Open the Excel Link Manager from the UpSlide ribbon, or press Ctrl+Shift+R.
- Select the items you want to update.
- Click Update All in the bottom-right corner of the pane.
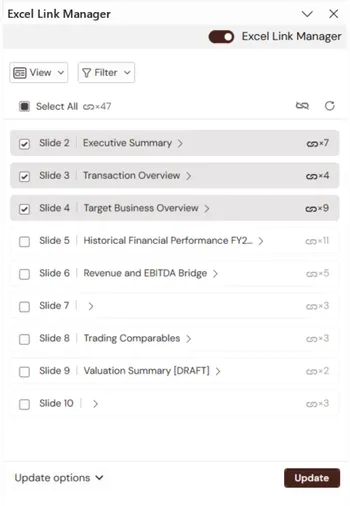
UpSlide marks each successfully updated link with a green check. If an item shows an error or warning, refer to this troubleshooting article for help.
For more information, refer to the article about the Excel Link Manager.
If you don’t see the Excel Link Manager, you might not be on the latest version of UpSlide. Restart your Office applications or contact support@upslide.com for help.